Relying Party
Introduction
A Relying Party (a verifier of attestations presented by the wallet) will want to have a global idea of what he/she needs to do when integrating their application with the wallet environment.
This document aims to provide a global outline of components used, the necessary decisions, data, certificate(s), and setup of the “Ontvangende Voorziening” plus integration thereof with their own frontend(s) and backend.
Step-by-step
As a relying party you want to verify certain attributes of a natural person which are contained in the NL wallet. To be able to do so there are a few things you must do. Roughly these are a couple of onboarding steps and the actual configuration of the “Ontvangende Voorziening” (which can be translated as “Receiving Facility”, a facility that receives attributes to verify):
Determine which attributes you need to verify
Provide required relying party data
Request a certificate (per
usecase, usually one)Configure your OV (Ontvangende Voorziening)
Proof-of-function, test calls
Integrate the OV with your own application
We’ll start with an overview of the system architecture, specifically its main components and where to find more information.
We’ll then cover the decisions you need to make regarding which attributes you need to verify.
We’ll list required fields you need to provide us, which we need to construct a
reader_auth.json which will become part of your certificate, as a X.509v3
custom extension.
We’ll show how you can request your certificate which enables you to talk to the Wallet, and test connectivity.
Finally, we’ll give a high-level overview of what an OV looks like, and what the disclosure flow looks like, and where you can find the API documentation and example calls.
Architecture Overview

In the above diagram, we see the main components involved in a disclosure session. The main components are:
DigiD: Digitale Identiteit, a digital identification system;
Pseudonym Service: A service that pseudonimizes BSN numbers;
(BRP-V) Authentic Source: A source of attributes, made accessible by a so-called Verstrekkende Voorziening (VV);
VV: Verstrekkende Voorziening, the party that issues attributes;
OV: Ontvangende Voorziening, an application that runs on-premises or in-cloud of a relying party that can verify attributes, which this document is about;
Relying Party Application: An app running on-premises or in-cloud of the relying party that needs to do something with the result of a verification of attributes;
Wallet App: The wallet app running on a mobile device;
Missing from the above diagram, but worth mentioning:
Wallet Web The frontend helper JavaScript/TypeScript library which helps relying parties integrate their application with the Wallet platform.
For the purpose of this document, we won’t go into all components mentioned above, in particular, “DigiD” and “Pseudonym Service” are out-of-scope with regards to this outline.
The Wallet platform largely consists of “Verstrekkende Voorziening(en)”, that can issue attributes and attestations, “Ontvangende Voorziening(en)” that handle disclosure of attributes sessions, and the Wallet App, which contains attributes and attestations received through the “Verstrekkende Voorziening(en)”, enabling the Wallet App to disclose them to “Ontvangende Voorziening(en)”.
The “Ontvangende Voorziening(en)” are things that relying parties configure and maintain on their own premises or cloud environments, which they integrate with their own application, and which interacts with the Wallet app, in order to verify attributes and attestations for usage in their own application.
This document is about configuring an “Ontvangende Voorziening”. To have a broader view on the Wallet platform, you can have a look at the Architecture Documents. Specifically, the Project Start Architecture, the Solution Architecture Document and the Design Considerations (all of which can be found at the aforementioned link).
The Wallet platform is fully open-source; you can find the project on GitHub: nl-wallet (note: we currently have a dependency on nl-rdo-max which is also open-source but lags behind a bit in updates - we’re intending on getting some currently-private changes upstreamed, work in progress).
Preparations and Onboarding
The subsections below describe the decisions you need to make as a relying
party with regards to attributes you want to verify, what data we require from
you, how to create a certificate request for a certificate (which is configured
for usage within the verification_server), and how to file all of that with us.
Decisions
Ultimately, as an RP (relying party, an entity that wants to verify attributes) you need to decide what attributes you want to verify, and communicate the purpose of the verification. So:
Which attribute(s):
birth_date,age_over_18,gender, etcWhat purpose: describe why you need to verify the attribute(s)
Attributes in the wallet are grouped in things called attestations and the
wallet app displays these attestations as cards. The attestations are stored in
the mdoc format (see ISO/IEC 18013-5:2021 and ISO/IEC 23220-4).
In the verification_server we have the concept of usecases, which encapsulate what
you want to use a disclosure for, for example to verify a legal age or to login
to a website. Essentially, every certificate that you create to be able to
verify attributes for some purpose, represent a certificate/key-pair, and the
verification_server can support multiple usecases. In this guide we will be
creating a single certificate (so, for a single usecase), but there’s nothing
stopping you from creating/requesting multiple certificates for different
usecases.
We currently (as of 2024-08-08) support two mdoc doctypes: PID_DOCTYPE
and ADDRESS_DOCTYPE. An mdoc contains one or multiple attributes that you
can verify. For your convenience, we list the attributes for both doctypes here:
What a PID_DOCTYPE looks like
Attribute |
Item |
Source |
Description |
|---|---|---|---|
|
10210 |
haal_centraal |
First names (voornamen) |
|
10230, 10240 |
haal_centraal |
Prefix (voorvoegsel) and surname (achternaam) |
|
unimplemented |
First names at birth (voornamen bij geboorte) |
|
|
unimplemented |
Birth name (geboortenaam) |
|
|
unimplemented |
Gender (geslacht) |
|
|
10310 |
haal_centraal |
Birth date (geboortedatum) |
|
derived |
Older than 18 (ouder dan 18) |
|
|
unimplemented |
Place of birth (geboorteplaats) * |
|
|
unimplemented |
City, town or village of birth (geboortestad) |
|
|
unimplemented |
State or province of birth (geboortestaat of -provincie) |
|
|
unimplemented |
Country of birth (geboorteland) |
|
|
10120 |
haal_centraal |
Citizen service number (burgerservicenummer) |
_* birth_place is a combination of birth_country, birth_state and birth_city_
What an ADDRESS_DOCTYPE looks like
Attribute |
Item |
Source |
Description |
|---|---|---|---|
|
unimplemented |
Address (adres) * |
|
|
81115, 81110 |
haal_centraal |
Named public space (naam openbare ruimte) or street name (straatnaam) |
|
81120, 81130, 81140 |
haal_centraal |
House number (huisnummer) |
|
81160 |
haal_centraal |
Postal code (postcode) |
|
81170 |
haal_centraal |
City, town or village (woonplaats) |
|
unimplemented |
State or province (staat of provincie) |
|
|
unimplemented |
Country (land) |
_* resident_address is a combination of resident_street, house_number, postal_code, city, state and country_
Collect the attributes you want to verify and describe the purpose, they are needed when we file the request later on.
Required Data
The Wallet needs a bunch of data about you, the relying party which we store as a part of the certificate in a so-called X.509v3 extension. We use this data to present a view of the relying party in the wallet app GUI. What we need to know:
REQUIRED_DATA
Attribute |
Languages |
Description |
|---|---|---|
|
|
For what purpose are you attesting? Login? Age verification? etc. |
|
- |
Do you have an intent to retain data? For how long? |
|
- |
Do you have an intent to share data? With whom? |
|
- |
Do you allow users to request deletion of their data, yes/no? |
|
|
Name of the relying party as shown in the wallet app. |
|
|
Legal name of the relying party. |
|
|
Short one-sentence description or mission statement of the relying party. |
|
- |
The home URL of the relying party. |
|
|
The home city of the relying party. |
|
|
Bank, Municipality, Trading, Delivery Service, etc. |
|
- |
A logo to display in the wallet app, preferably in SVG format. |
|
- |
Two-letter country code of relying party residence. |
|
- |
Chamber of commerce number of relying party. |
|
- |
Link to relying party’s privacy policy. |
|
- |
What is the URL the user sees in the address bar when they start disclosure? |
|
- |
List of attributes determined in previous section. |
Collect answers to the above, they will be needed once we file the request later on.
Note: In the Languages column where it says nl+en for example, please
provide both a dutch and an english answer.
Example reader_auth.json
To give you an idea with regards to how we format this data, here’s an
example of the JSON data (a so-called reader_auth.json) we produce from your
answers (this is an example for the municipality of Amsterdam):
{
  "purposeStatement": {
    "nl": "Inloggen",
    "en": "Login"
  },
  "retentionPolicy": {
    "intentToRetain": true,
    "maxDurationInMinutes": 525600
  },
  "sharingPolicy": {
    "intentToShare": false
  },
  "deletionPolicy": {
    "deleteable": false
  },
  "organization": {
    "displayName": {
      "nl": "Gemeente Amsterdam",
      "en": "Municipality of Amsterdam"
    },
    "legalName": {
      "nl": "Gemeente Amsterdam",
      "en": "Municipality of Amsterdam"
    },
    "description": {
      "nl": "Alles wat we doen, doen we voor de stad en de Amsterdammers.",
      "en": "Everything we do, we do for the city and the people of Amsterdam."
    },
    "webUrl": "https://amsterdam.nl",
    "city": {
      "nl": "Amsterdam",
      "en": "Amsterdam"
    },
    "category": {
      "nl": "Gemeente",
      "en": "Municipality"
    },
    "logo": {
      "mimeType": "image/svg+xml",
      "imageData": "<svg width=\"64\" height=\"64\" viewBox=\"0 0 64 64\" fill=\"none\" xmlns=\"http://www.w3.org/2000/svg\"><rect width=\"64\" height=\"64\" rx=\"12\" fill=\"#FF0000\"/><path d=\"M25 53.1823L29.1985 48.9481L25 44.7139L27.8015 41.8886L32 46.1228L36.1985 41.8886L39 44.7139L34.8015 48.9481L39 53.1823L36.191 56L31.9925 51.7658L27.794 56L25 53.1823ZM25 19.2861L29.1985 15.0519L25 10.8253L27.8015 8L32 12.2342L36.191 8L38.9925 10.8253L34.794 15.0595L38.9925 19.2937L36.191 22.1114L31.9925 17.8772L27.794 22.1114L25 19.2861ZM25 36.2455L29.1985 32.0114L25 27.7848L27.8015 24.9594L32 29.1936L36.1985 24.9594L39 27.7848L34.8015 32.0189L39 36.2531L36.191 39.0709L31.9925 34.8367L27.794 39.0709L25 36.2455Z\" fill=\"white\"/></svg>"
    },
    "countryCode": "nl",
    "kvk": "1234-1234",
    "privacyPolicyUrl": "https://amsterdam.nl/privacy"
  },
  "requestOriginBaseUrl": "https://amsterdam.nl",
  "attributes": {
    "com.example.pid": {
      "com.example.pid": {
        "bsn": {}
      }
    }
  }
}
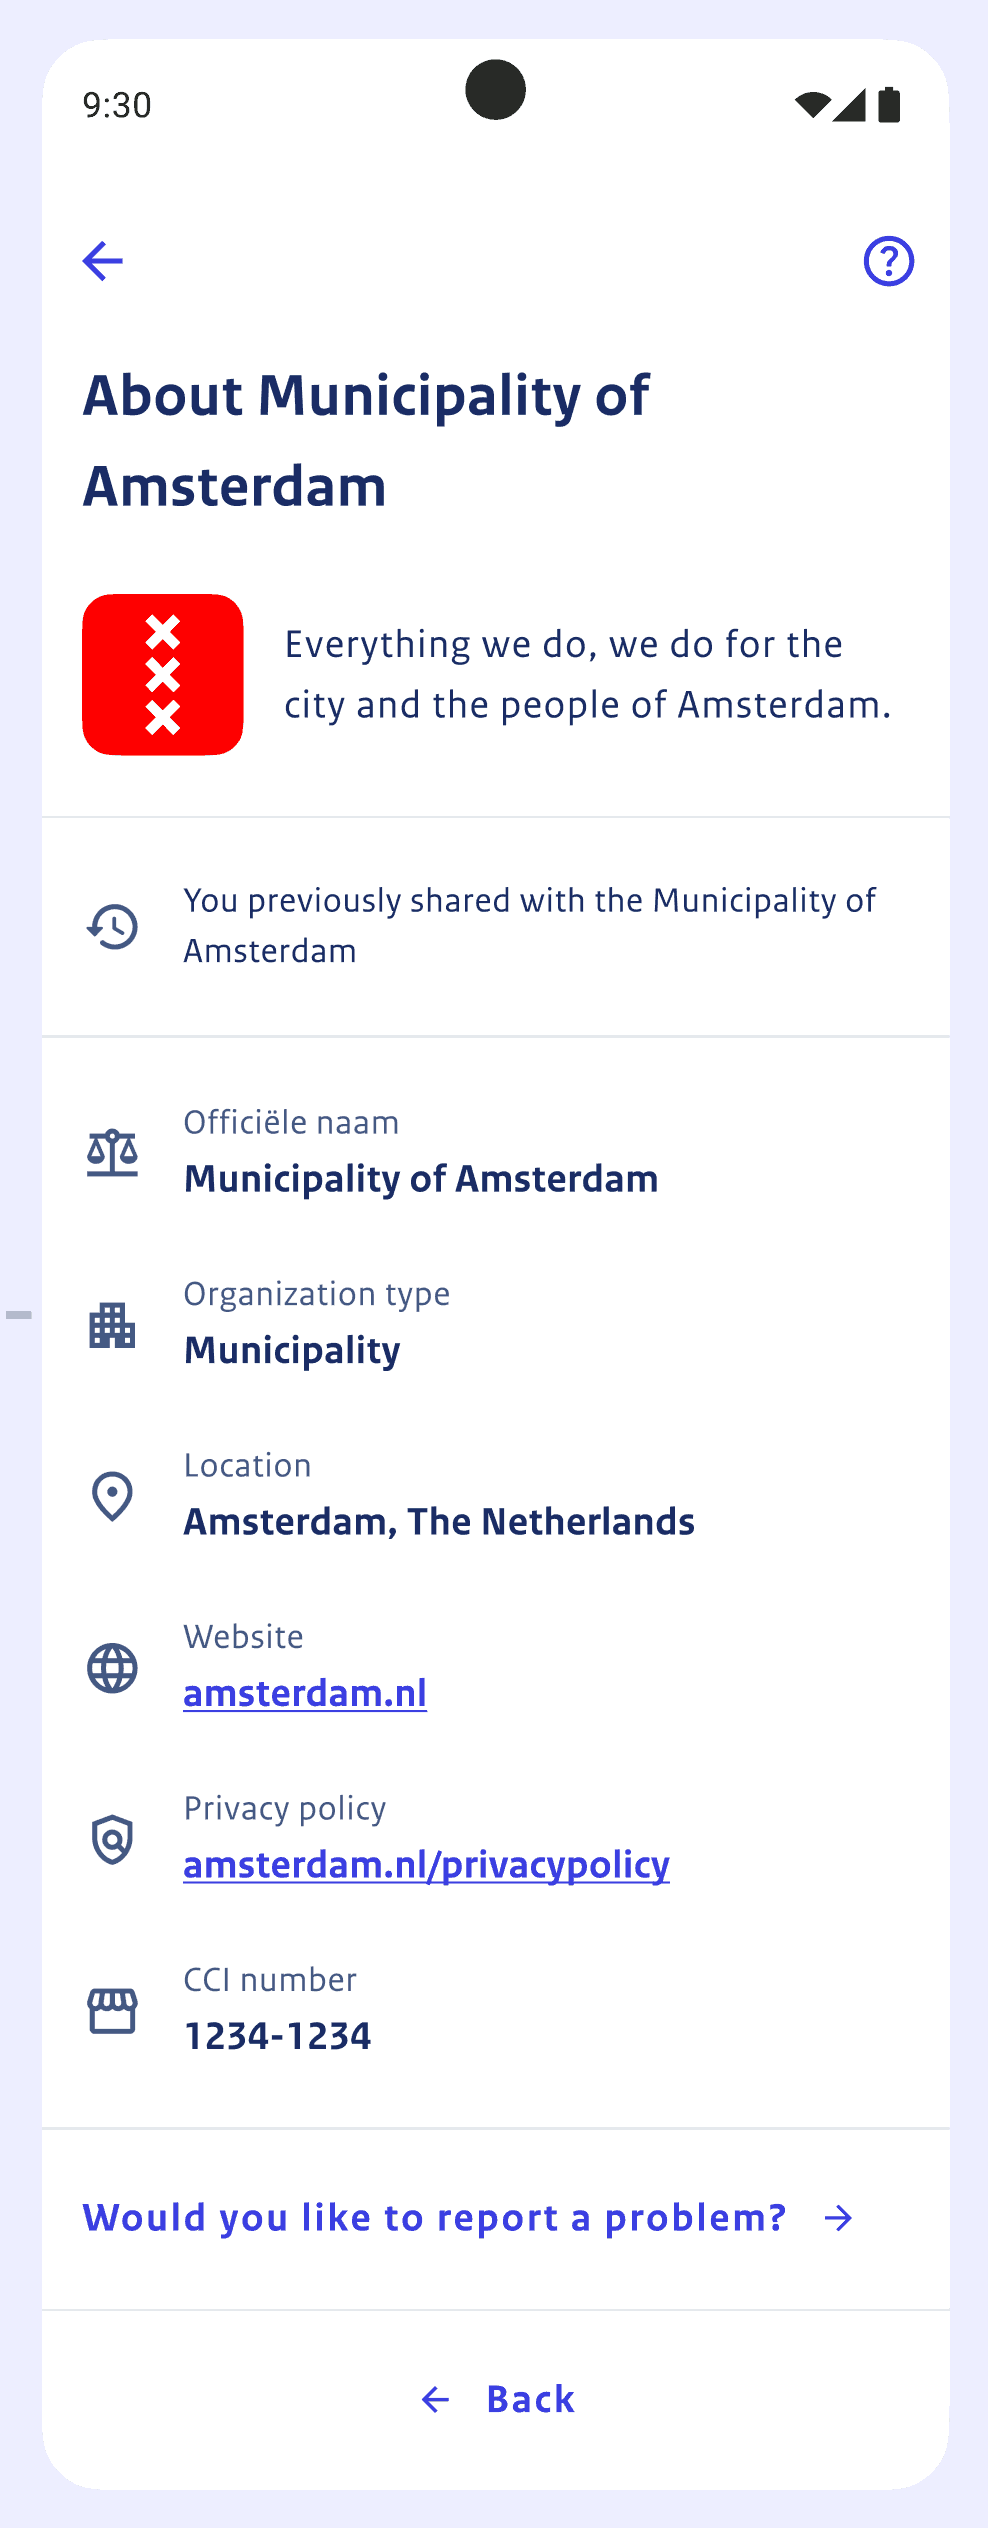
Example Screenshot of reader_auth.json Data Used in Wallet App
The data from reader_auth.json is used in various parts of the app. For
illustrational purposes, see below a screenshot of a screen showing details
about the municipality of Amsterdam:
Certificate Request
You will need a certificate. We currently use our own certificate authority to sign and trust certificates (in the future we might work with a public CA like PKI-Overheid).
When you send us your certificate request, we will send you a signed certificate and a copy of our certificate authority certificate.
Note that the verification server supports both software private keys and hardware private keys located in an HSM. The remainder of this document assumes software keys.
Without further ado, let’s create a private key, an openssl config and a
certificate request:
# Create a private key.
openssl ecparam -name prime256v1 -genkey -noout -outform der -out rp-pkcs1.key

# Convert key to PKCS#8 format.
openssl pkcs8 -topk8 -inform DER -outform DER -nocrypt -in rp-pkcs1.key -out rp-pkcs8.key
rm rp-pkcs1.key
mv rp-pkcs8.key rp.key

# Set organization name to previously specified organization_legal_name.
export ORGANIZATION_NAME="Your legal organization name here"

# Set common name to the hostname of whatever is using the certificate.
export COMMON_NAME="foo.yoursite.com"

# Create an openssl configuration file used to create the request later on.
cat <<EOF > "rp.cfg"
[req]
distinguished_name = req_distinguished_name
req_extensions = v3_req
prompt = no

[req_distinguished_name]
C = NL
ST = Zuid-Holland
L = Den Haag
O = $ORGANIZATION_NAME
CN = $COMMON_NAME

[v3_req]
extendedKeyUsage = critical, 1.0.18013.5.1.6
subjectAltName = @alt_names

[alt_names]
DNS.0 = $COMMON_NAME
EOF

# Create the certificate request.
openssl req -config rp.cfg -new -key rp.key -out rp.csr
You should now have three files: rp.key, rp.cfg and rp.csr. Keep the key
safe somewhere, don’t share it, not even with us. The certificate request,
rp.csr, and the configuration, rp.cfg, we will send together with the
decided attributes and needed data when we file the request in the next section.
Note: When we receive the requested data and the certificate request, we will serialize that as a JSON string and add it to the certificate as an X.509v3 extension with OID 2.1.123.1.
File Request
Alright, let’s review what we’ve got so far:
You’ve determined the names of the attributes you want to verify;
You’ve written down a description of the purpose of verification;
You’ve collected all the required data attributes requested previously;
You’ve followed the certificate request steps and have an
rp.cfgdocument;You’ve followed the certificate request steps and have an
rp.csrdocument;
Put all of the above in the following e-mail template, and attach your signing
request (rp.csr), certificate configuration file (rp.cfg), and optionally
some SVG logo data:
Dear NL-Wallet,

Please find herein an onboarding request for us as a relying party. Attached
you will find our signing request, our certificate configuration file, and
possibly, some SVG logo data.

Please find below the answers with regards to requested data, attributes for
verification and descripion of purpose.

Attributes requested for verification:
<fill in list of attributes previously documented>

Description of purpose:
<describe purpose of verification>

Required data:
purpose_statement: For what purpose are you attesting? Login? Age verification? etc.
retention_policy: Do you have an intent to retain data? For how long?
sharing_policy: Do you have an intent to share data? With whom?
deletion_policy: Do you allow users to request deletion of their data, yes/no?
organization_display_name: Name of the relying party as shown in the wallet app.
organization_legal_name: Legal name of the relying party.
organization_description: Short one-sentence description or mission statement of the relying party.
organization_web_url: The home URL of the relying party.
organization_city: The home city of the relying party.
organization_category: Bank, Municipality, Trading, Delivery Service, etc.
organization_logo: A logo to display in the wallet app, preferably in SVG format.
organization_country_code: Two-letter country code of relying party residence.
organization_kvk: Chamber of commerce number of relying party.
organization_privacy_policy_url: Link to relying party's privacy policy.
request_origin_base_url: What is the URL the user sees in the address bar when they start disclosure?.
list_of_verifiable_attributes: List of attributes determined in previous section.

Kind regards,


<relying party>

<don't forget to attach signing request, certificate configuration file and
optionally, som SVG data for your logo>
Mail the above to our company/group email address (not published here for the time being) and we will pick up the request from there.
What you’ll receive from us in reply to the above is:
A
DERformat certificate based on your certificate-request with an X509v3 extension with OID 2.1.123.1 containing the aforementionedreader_auth.jsonpopulated with your provided required data.A so-called trust-anchor certificate, also in
DERformat which represents the issuer(s) you as a relying party trust as a party that issues attributes.A universal link base URL for one of our environments, which you need to configure when setting up the
verification_server(covered in the Universal link base URL section of the installation chapter).
Wallet server installation
After you have obtained a certificate for your usecase, following the
previously documented steps, you are ready to setup and configure your
verification_server.
Obtaining the software
The verification_server binary can be obtained by compiling the Rust code from
our repository, or be provided to you. As of this writing (2024-08-08) we
do not yet make binaries available automatically (work-in-progress). And so you
can either compile the source code (possible, but not supported as of yet) or
ask us for a binary. In the short-term, especially in light of the coming shared
testing cases, we will provide binaries to relying parties manually.
Creating a database backend (optional)
This section is optional; You can run the verification_server with a storage
URL memory://, which is the default, which will make it store session state in
memory (which will be bound to a specific instance of a verification_server).
When using in-memory session state, on server shutdown or crash, any session
state will be lost. When using a postgres:// storage URL in the
verification_server.toml configuration file, it causes the server to store its
session state in a PostgreSQL database.
In this section we’ll assume you don’t have a PostgreSQL database server yet, and set that up using docker (although you could set it up bare-metal also, which is left as an exercise to the reader in case such a configuration is preferred). We’ll then create a database, configure credentials and configure the schema (tables, columns).
Create a database server
Since we’ll be using Docker, we’ll run the latest version of PostgreSQL (version
16.3 as of this writing), using a Docker volume named postgres for the
database storage. We’ll run in the background (the --detach option) and
auto-clean up the running container after stop (--rm). We create two random 16
character strings for the postgres and wallet users:
# Create a random password for the postgres user.
export PGPASSWORD="$(openssl rand -base64 12)"
# Run a Docker image named postgres.
docker run --name postgres --volume postgres:/var/lib/postgresql/data \
--rm  --detach --publish 5432:5432 --env POSTGRES_PASSWORD="$PGPASSWORD" postgres
Create user and database itself:
Next, we’ll create a user for the database and the database itself:
# Create a random password for the wallet user.
export WAPASSWORD="$(openssl rand -base64 12)"
# Note that the below commands use PGPASSWORD to execute.
psql -h localhost -U postgres -c "create user wallet with password '$WAPASSWORD';"
psql -h localhost -U postgres -c "create database verification_server owner wallet;"
Apply database schema:
Finally, we’ll create a verification_server_schema.sql file and run that:
cat <<EOF > "verification_server_schema.sql"
SET statement_timeout = 0;
SET lock_timeout = 0;
SET idle_in_transaction_session_timeout = 0;
SET client_encoding = 'UTF8';
SET standard_conforming_strings = on;
SET check_function_bodies = false;
SET client_min_messages = warning;
SET row_security = off;
SET default_tablespace = '';
SET default_table_access_method = heap;

-- Create table.
CREATE TABLE IF NOT EXISTS public.session_state (
  type character varying NOT NULL,
  token character varying NOT NULL,
  data json NOT NULL,
  status character varying NOT NULL,
  last_active_date_time timestamp with time zone NOT NULL
);

-- Set owner.
ALTER TABLE public.session_state OWNER TO wallet;

-- Add constraint.
DO \$\$
BEGIN
  ALTER TABLE ONLY public.session_state
    ADD CONSTRAINT session_state_pkey PRIMARY KEY (type, token);
EXCEPTION
  WHEN duplicate_table THEN  -- Catch on PostgreSQL <= 9.6
  WHEN duplicate_object THEN -- Catch on PostgreSQL >= 9.6 and <= 10.1
  WHEN invalid_table_definition THEN -- Catch on PostgreSQL >= 11.9
    RAISE WARNING 'Constraint already exists, skipping';
END;
\$\$;

-- Create index.
CREATE INDEX IF NOT EXISTS session_state_type_status_last_active_date_time_idx
  ON public.session_state USING btree (type, status, last_active_date_time);
EOF
psql -h localhost -U postgres -d verification_server -f "verification_server_schema.sql"
You now have a database server running, with an admin user named postgres and
a regular user named wallet for which you can see the passwords by issuing:
echo -e "postgres: $PGPASSWORD\n wallet: $WAPASSWORD\n". Take a moment to
store them somewhere, because you’ll need them later on.
The database in the server is called verification_server, and contains the
above default schema (i.e., a session_state table with a primary key
constraint and an index on last_active_date_time).
Creating a configuration
In the following sections we’ll create environment variables for specific settings, which we will finally use to construct a configuration file.
The storage settings
The default storage settings URL is memory:// which causes the server to store
session state in-memory, which is ephemeral. I.e., on server crash or shutdown,
any existing session state is lost. When you use the postgres:// URL, you tell
the server to store session state in a PostgreSQL database (see previous
optional section on setting up the database).
Using in-memory session state
export WASTORAGEURL="memory://"
Using database persisted session state (optional)
export WAUSERNAME="wallet"
# Note: We assume that you still have $WAPASSWORD set in your environment.
#       See previous section documenting how to set up a database backend.
export WADBHOST="localhost"
export WADBPORT=5432
export WADATABASE="verification_server"
export WASTORAGEURL="postgres://$WAUSERNAME:$WAPASSWORD@$WADBHOST:$WADBPORT/$WADATABASE"
Determine public URL
The public_url is the URL that is used to reach the public interface of the
verification_server from the internet.
For example, internally, you might host your server on a machine called
verification.internal.root.lan, whilst you’ve set-up a load balancer or
reverse proxy which serves verify.example.com, which is the name you use on
the internet to reach this internally hosted service (i.e., via the load
balancer or reverse proxy).
In this document, we’ve previously used “Mijn Amsterdam” as an example, so lets configure a plausible example URL:
export WAPUBLICURL="https://verify.example.com/"
Universal link base URL
The universal link base URL is used to configure the verification_server to
communicate the correct environment-specific universal link to the the mobile
operating system which is running the NL Wallet app. It is used to trigger the
mobile operating system to start the NL Wallet app when clicking the link or
scanning the QR code.
You will have received the universal link base URL with the e-mail response to your certificate request (as mentioned in the File Request) section previously.
For example, if you want to configure your verification_server for usage with
a Wallet App built for the acceptance environment, you’d configure it as such:
export WAULBASEURL="https://app.example.com/ul/"
The ephemeral ID secret
The ephemeral ID secret is used for (rotating) QR code generation, and
configured once in the verification_server.toml:
export WAEPHEMERALIDSECRET="$(dd if=/dev/urandom bs=64 count=1 | xxd -p | tr -d '\n')"
Configuring the trustanchor and the usecase
In the File Request section we’ve requested a certificate for
the usecase and, if everything went well, you’ve received a signed certificate
and a so-called trust-anchor certificate. Additionally, you will still have
the key matching your usecase certificate.
We’ll assume your usecase certificate is in the DER format and named
rp.crt, your key is named rp.key, and finally you have two trust anchor (ca)
certificates called issuer_ta.crt and reader_ta.crt. The issuer_ta.crt
file contains the root certificate for issuer certificates and the
reader_ta.crt file contains the root certificate for reader certificates.
Finally, you’ll have to come up with some name for your usecase; in the
settings below, we assume the name login-mijn-amsterdam. Note that the name
is only used as an identifier, it can be freely chosen.
export WAUSECASENAME="login-mijn-amsterdam"
export WAUSECASECERT="$(cat rp.crt | openssl base64 -e -A)"
export WAUSECASEKEY="$(cat rp.key | openssl base64 -e -A)"
export WAISSUERTRUSTANCHOR="$(cat issuer_ta.crt | openssl base64 -e -A)"
export WAREADERTRUSTANCHOR="$(cat reader_ta.crt | openssl base64 -e -A)"
Creating the configuration file
In the previous sections, you’ve set a bunch of environment variables which we
will use in this section to generate our verification_server.toml
configuration file (i.e., you need to run the following commands in the same
place where you previously typed the export commands). To generate our
configuration file, issue the following command:
cat <<EOF > "verification_server.toml"
public_url = '$WAPUBLICURL'
universal_link_base_url = '$WAULBASEURL'
issuer_trust_anchors = [
    "$WAISSUERTRUSTANCHOR",
]
reader_trust_anchors = [
    "$WAREADERTRUSTANCHOR",
]

[storage]
url = '$WASTORAGEURL'

[wallet_server]
ip = '0.0.0.0'
port = 8001

[requester_server]
ip = '0.0.0.0'
port = 8002

ephemeral_id_secret = '$WAEPHEMERALIDSECRET'

[usecases.$WAUSECASENAME]
certificate = '$WAUSECASECERT'
private_key = '$WAUSECASEKEY'
EOF
Note: when using an HSM key, the private_key field of the usecase should be
the HSM key label, and the configuration must contain an [hsm] section, with
the following structure.
[hsm]
library_path = "${HSM_LIBRARY_PATH}"
user_pin = "${HSM_USER_PIN}"
max_sessions ="${HSM_MAX_SESSIONS}"
max_session_lifetime_in_sec = "${HSM_SESSION_LIFETIME}"
It is possible to use both hardware and software private keys in the same
verification server instance. When the private_key contains a Base64 DER-
encoded private key, it’s used as software key, otherwise it will use the
value of private_key as the HSM key label. The configuration is verified
at startup, so invalid (key) configuration will be reported immediately.
You should now have a configuration file in the current directory called
verification_server.toml. Feel free to check the file to see if everything
looks like you’d expect.
Configuring an API key (optional)
In our configuration, the wallet server is configured with a separate port for
the public (wallet) and private (requester) endpoints. The private endpoint can
additionally be configured to require an API key, which needs to be passed with
a request as an Authorization header containing Bearer your_secret_key.
To configure the usage of an API key, you need to add a section as follows to
the configuration file (choose a better key than your_secret_key):
[requester_server.authentication]
api_key = "your_secret_key"
Configuring Cross-Origin Resource Sharing (optional)
Cross-Origin Resource Sharing (CORS) can be configured on the verification server for when the Relying Party application is hosted on a different URL than the verification server.
To configure CORS, you need to add allow_origins to the [verifier] section
with a list of all the Relying Party URLs. Replace "https://example.com" in
the following snippet with a comma separated list of the required urls.
[verifier]
allow_origins = ["https://example.com"]
Running the server for the first time
In section Obtaining the software we have described
how you can obtain the software. In this section, we assume you have a Linux
AMD64 static executable called verification_server that you can run. Make sure
the configuration file verification_server.toml is in the same directory as
the binary and run it in the foreground as follows:
./verification_server
Server logging
Logging can be configured using the environment variable RUST_LOG. For
example, to run the server with debug logging, use the following command.
RUST_LOG=debug ./verification_server
In addition the verification_server.toml contains the following options:
log_requests = false          # whether HTTP requests/responses should be logged
structured_logging = false    # if `true` logging is done in JSON
Validating the configuration
During startup, the verification_server performs some checks on the
configuration to prevent common configuration problems. Most notably the
following checks are performed:
Verify all use-case certificates are valid
Verify all use-case certificates are signed by any of the
reader_trust_anchorsVerify all use-case certificates are reader-certificates, and contain the necessary Extended Key Usages and the
reader_auth.jsonVerify all use-case key-pairs are valid, i.e. the public and private keys should belong together
If this process discovers any configuration errors, the application will report an error and abort. For more insights into this process, enable debug logging.
If all went well, the server is now running and ready to serve requests. To test the service, you can send session initiation requests and status requests to it.
Check out the Example calls section for how to do that. For
example, when you initiate a disclosure session,
you will see something like the following output from the verification_server:
2024-08-09T14:30:55.016412Z  INFO openid4vc::verifier: create verifier session: some_usecase
2024-08-09T14:30:55.019806Z  INFO openid4vc::verifier: Session(XH32jw4jRSnQsLNiJxryDCqArmWfv5Fi): session created
For further information about how to construct calls to the endpoints, check out the API specifications section.
Background
Now that you can interact with the wallet platform, you are ready to start working on integration your own application with your “Ontvangende Voorziening”.
An “Ontvangende Voorziening” is realized by the verification_server,
which is a software component developed by the NL wallet team
which you as a relying party run on-premises or within your cloud environment
in order to interact with the wallet platform.
In the following subsections we’ll give you a high-level overview of what an “Ontvangende Voorziening” looks like, how to integrate it with your application and some directions with regards to the API specifications.
What a Disclosure Session Looks Like

In the above flow diagram you see the components involved in a disclosure session. Except for the “PID Issuer (VV)” and the “Wallet App”, these run on premises or within cloud environment(s) of the relying party (i.e., you).
Let’s walk through a typical (cross-device, note on same-device flows in following section) disclosure session (for full details, have a look at the VV/OV SAD and our component interaction flow for disclosures).
Note the possible session states:
CREATED: session createdWAITING_FOR_RESPONSE: waiting for user to scan or follow QR/ULDONEwhich has substates:SUCCES,FAILED,CANCELED, andEXPIRED
Note the “actors/components” we distinguish between:
user: user of the wallet_app, initiating an attribute disclosure sessionwallet_app: the wallet app, running on a users’ mobile phoneverification_server: the verification_server component of the OVrp_frontend: the (JavaScript/HTML/CSS) frontend of the relying party app can be-or-use previously mentionedwallet_webJavaScript helper libraryrp_backend: the (server) backend of the relying party application
In the diagram, the user is the small stick-figure at the top, the actor who
initiates some task he/she wants to accomplish. the wallet_app is the blue box
on the right. The verification_server is the big block in the middle (shown as
“Verifier Service (Ontvangst Voorziening, OV)” containing the configuration, the
verifier, and the validator components). The rp_frontend and rp_backend are
represented by the big orange/beige block on the left (shown as “Relying Party
Application”).
Overview of a flow for cross device attribute disclosure:
userinitiates action (i.e., clicks a button on web page of relying party in their desktop or mobile webbrowser);rp_frontendreceives action, asksrp_backendto initiate session;rp_backendin turn callsverification_serverwith a session initialization request, receiving asession_url, anengagement_url, and adisclosed_attributes_urlas a response. The session initially has aCREATEDstatus;rp_backendkeepsdisclosed_attributes_urlfor itself, and returnssession_urlandengagement_urltorp_frontend;rp_frontendencodes a QR/UL (QR Code, universal link) using theengagement_urland displays this to theuser;
The user can now activate their wallet_app QR scanner and scan the QR or
navigate to the universal link (UL). In parallel, rp_frontend will poll the
session_url which will change status due to action (or inaction) by the
user. So, assuming everything goes fine:
rp_frontendpollssession_urlfor status. It will re-poll for a configured time-limit when receiving aCREATEDorWAITING_FOR_RESPONSEstatus. The poll will terminate onDONE;After
usercompletes the scanning of the QR or followed the universal link,wallet_appparses/extracts the QR/UL and starts a device engagement session withverification_server, which in turn returns the relying party details and the requested attributes to thewallet_app;The
wallet_appshows the relying party details and the requested attributes to theuserand gives theuserthe option to consent or abort;
The user can abort, which will terminate the session with a CANCELED status.
The user can also wait too long, which would result in an EXPIRED status.
The FAILED status can occur when other, infrastructural and/or network-related
problems are encountered. Assuming the user consented, let’s continue:
wallet_appsends a device response containing the disclosed attributes and proofs_of_possession to theverification_server;verification_servervalidates if attributes are authentic and valid and if they belong together and returns an indication of success back to thewallet_app, which in turn confirms the success by displaying a dialog to theuser.verification_serveradditionally updates the status of the session toDONEwith theSUCCESSsubstate (assuming validation went fine);The poll running on the
rp_frontendwill terminate due to theDONEsession state;The
rp_frontendreturns the result of the session to therp_backend;The
rp_backendchecks the status of the session. OnDONEwith substateSUCCESS, it will call the associateddisclosed_attributes_urlwhich it kept around (saved) in step 4 to retrieve the disclosed attributes. When substate is notSUCCESS, it will not retrieve the disclosed attributes but invoke an error_handler of sorts (for example) which displays the error condition;rp_backendhandles disclosed attributes, returns status torp_frontend(for example: user is authenticated, here have a token);
Cross Device vs. Same Device
Same-device flows differ from cross-device flows in how the QR/UL is encoded.
The rp_frontend detects the user-agent and from that determines if a
Cross-device or Same-device flow is appropiate. When it encodes for a
Same-device flow, the resulting Universal link can be directly opened by the
wallet_app on the same device, which then starts device engagement towards
the verification_server (see step 7 above).
Notes on Requirements Applicable to Your Application
Below a list of things to know about the wallet platform and more specifically, what you need to keep in mind when you integrate the usage of the wallet for identification or verification of attributes with your application:
The wallet app presents attestations using the OpenID4VP protocol standard using the ISO/IEC 18013-5:2021 mdoc credential format;
Any disclosure session initiation request must include the reason why the relying party is requesting the attributes;
A relying party MUST NOT track, in the broadest sense of the word;
A relying party needs to adhere to the EU-GDPR (Nederlands: EU-AVG) GDPR;
It is required to follow accessibility guidelines set forth in the WCAG;
It is expected that you use the
wallet_webfrontend helper library;The standard buttons for login and sharing should be used, but one can use custom button text (within reason);
Button styling and call-to-action can be customized by relying party;
The text “NL Wallet” should always be visible in the call-to-action;
Logo of “NL Wallet” should be visible next to the call-to-action.
Integration
If you look at the previous disclosure flow diagram, on the left side, you see the Relying Party application, which is an application you probably already have that you want to integrate with functionality the wallet provides (i.e., the verification of identity and/or certain specific attributes, in order to allow or disallow usage of (a part of) said application).
To integrate with the “Ontvangende Voorziening”, you modify your frontend and
backend application, using the wallet_web frontend library, integrating with
the verification_server (the implementation of the “Ontvangende Voorziening” on
your premises or in your cloud environment).
In the disclosure flow diagram, on the right, where the “Relying Party Application” is shown, you see a four integration/call points: “Configure Verifier”, “Initiate Disclosure Session”, “Start Result Poll Loop” and “Retrieve OV Result”:
Configuration of the verifier, executed manually by you, a one-time initial setup that stores a configuration about your app in the configuration component of the OV;
Initiation of a disclosure session, executed by your backend application;
The status check loop, executed by your frontend application, where we check for a status result, which indicates success or failure of the session.
Result retrieval, executed by your backend, which is a final conditional step dependent on a succesful completion status, which contains the disclosed_attributes.
The above is described in more detail in the previous section detailing an example disclosure flow.
It’s worth noting that the NL-Wallet team has developed a JavaScript library
(called wallet_web) that handles the status check loop and status return for
you.
API Specifications
The API specifications for the private (also known as the requester)
and public (also known as the wallet) endpoints are available in the
/documentation part of of the git repository.
Example calls
The verification_server has two ports: a “wallet server” port, which is a a “public”
endpoint that can be queried for session status, usually running on TCP port
8001, and a so-called “requester port” which is a “private” endpoint that can
optionally be configured to have authentication mechanisms (or otherwise bind to
a private/trusted/internal network), used to initiate sessions and retrieve
sensitive data, usually running on TCP port 8002.
Following is a collection of sample calls that illustrate how you interact with
the OV. Note that we’re using localhost, in your case it might be another
hostname, FQDN or IP address, depending on how you’ve set-up verification_server:
Initiate a Disclosure Session
curl --silent --request POST --json '{
  "usecase": "mijn_amsterdam",
  "items_requests": [
    {
      "docType": "com.example.pid",
      "nameSpaces": {
        "com.example.pid": {
          "given_name": true,
          "family_name": true,
          "own_family_name": true
        }
      }
    }
  ],
  "return_url_template": "https://relying-party/return"
}' 'http://localhost:8001/disclosure/sessions'
Example response:
{
  "session_token": "387f8vMgeE1NunRPqn55Tha1761EC54i"
}
Check Status of Session
curl --silent --request GET 'http://localhost:8001/disclosure/sessions/387f8vMgeE1NunRPqn55Tha1761EC54i?session_type=same_device'
Example responses:
{
  "status": "CREATED",
  "ul": "walletdebuginteraction://wallet.edi.rijksoverheid.nl/disclosure/sessions?request_uri=http%3A%2F%2Flocalhost%3A33245%2Fdisclosure%2Fsessions%2F387f8vMgeE1NunRPqn55Tha1761EC54i%2Frequest_uri%3Fsession_type%3Dsame_device%26ephemeral_id%3D6f169a2e10b9733d2fd5d83acb169753506a37d6a49b0abcc6790ba23300ed74%26time%3D2024-07-20T14%253A00%253A58.471204138Z&request_uri_method=post&client_id=mijn.amsterdam.nl"
}
(note that in the above response you see a ul universal link value with the
scheme walletdebuginteraction://. In acceptance and (pre)production
environments, you see a universal link based on the universal_link_base_url
setting in the verification_server configuration file.)
{
  "status": "WAITING_FOR_RESPONSE"
}
{
  "status": "DONE"
}
Retrieve Disclosure Results
curl --silent --request GET 'http://localhost:8002/disclosure/sessions/387f8vMgeE1NunRPqn55Tha1761EC54i/disclosed_attributes'
and with (required, see error response below too) nonce query parameter:
curl --silent --request GET' http://localhost:8002/disclosure/sessions/387f8vMgeE1NunRPqn55Tha1761EC54i/disclosed_attributes?nonce=rcofnse1SThIdSYAqXhnJNOTk9EmBweT'
Example responses:
{
  "type": "session_state",
  "title": "Session is not in the required state",
  "status": 400,
  "detail": "disclosed attributes requested for disclosure session with status other than 'Done'"
}
{
  "type": "nonce",
  "title": "Redirect URI nonce incorrect or missing",
  "status": 401,
  "detail": "missing nonce in redirect URI"
}
{
  "com.example.pid": {
    "attributes": {
      "com.example.pid": {
        "family_name": "De Bruijn",
        "own_family_name": "Molenaar",
        "given_name": "Willeke Liselotte"
      }
    },
    "issuer": "pid.example.com",
    "ca": "ca.example.com",
    "validityInfo": {
      "signed": "2024-07-20T14:00:58Z",
      "validFrom": "2024-07-20T14:00:58Z",
      "validUntil": "2025-07-20T14:00:58Z"
    }
  }
}
References
Below you’ll find a collection of links which we reference to through the entire text. Note that they don’t display when rendered within a website, you need to read the text in a regular text editor or pager to see them.
TODO: Link to VV/OV SAD, which are still in draft and not published yet.